The ideal design of an app should be easy on the user’s eye. It must have the right color schemes, interactive User Experience, and User Interface for providing the best services. For the design to come to reality, there should be an idea to represent the app and its services. Moreover, the app design steps should be followed to ensure a prototype to minimize the errors and choose from the best practices. Learn all about app design and development to present your services and products to the customers.
App designing can't be compared to other types of design. It is an all-embracing process that consists of different aspects. For instance, if you need to design a map, you will have to brainstorm an idea, suggest specific information to reflect on the map, and a map maker tool. That's all.
On the other hand, app designing requires a lot more from you. Your design ideas should emphasize competition, current trends, targeted audience, and cost of execution. All the steps from planning and creating a high-fidelity prototype must be based on how the test runs perform. With the right mind mapping and iterations, the app design will surely be successful. If you are wondering how to design an app, keep on reading to learn in detail.
Step 1. Planning:
Research of Competitors
Your app must have an industry-related audience that may already be using the competitor's services. Therefore, you may need to understand the current trends to target that audience better than the competition. Create a list of competitors and identify how they advertise and study their revenue-generating models. About 72% of the mobile application products find it hard to be successful due to the lack of a good business model.
So, this should help with a framework for campaigns and strategize your own business model. Moreover, with a better idea to include in your products, you may find your competitors weaknesses and offer more features. This will allow you to maximize the opportunities and revenue. Besides, if you are new to app design stages and market research, you may learn how to start a startup from scratch for a better end product.
Also, focus on the design process keeping in mind the competitor’s content such as blogs, social media channels, ebooks, and case studies. Their website development may give you an in sight into how they work and generate leads. It may provide you with information on current users and how to create content to reach them.
Research on Best Practices
Study the industry-based case studies to get familiar with the app design best practices. You may have to prioritize the critical features over non-essential ones. Moreover, focus on the lean startup process and customized methodologies to ensure your app design process moves swiftly.
As one-size never fits all, you may need to develop a plan that will work for your services. Besides, if your idea is unique and relevant, it may set a new standard for best practices in the industry.
Also, follow the approach to ideate, build, test, measure, iterate and improve to refine your app design and ideas. The goal of the ideas should be to minimize the development cycle to make the most of your resources. It will teach you how to understand the app design and how to accelerate the execution. The extensive planning and customer feedback ensure that you are not playing blind and have a substantial expected result.
Overall, the lean startup process is iterative and follows all the steps to validate your app design idea. You may repeat the process from prototype, testing, collecting response after the first cycle. Moreover, you may follow the MoSCoW approach to prioritize your app’s features. Mo expands for must-have, S for should have, Co for could have, and W for won’t have. These are self-explanatory for the addition of features to the app.
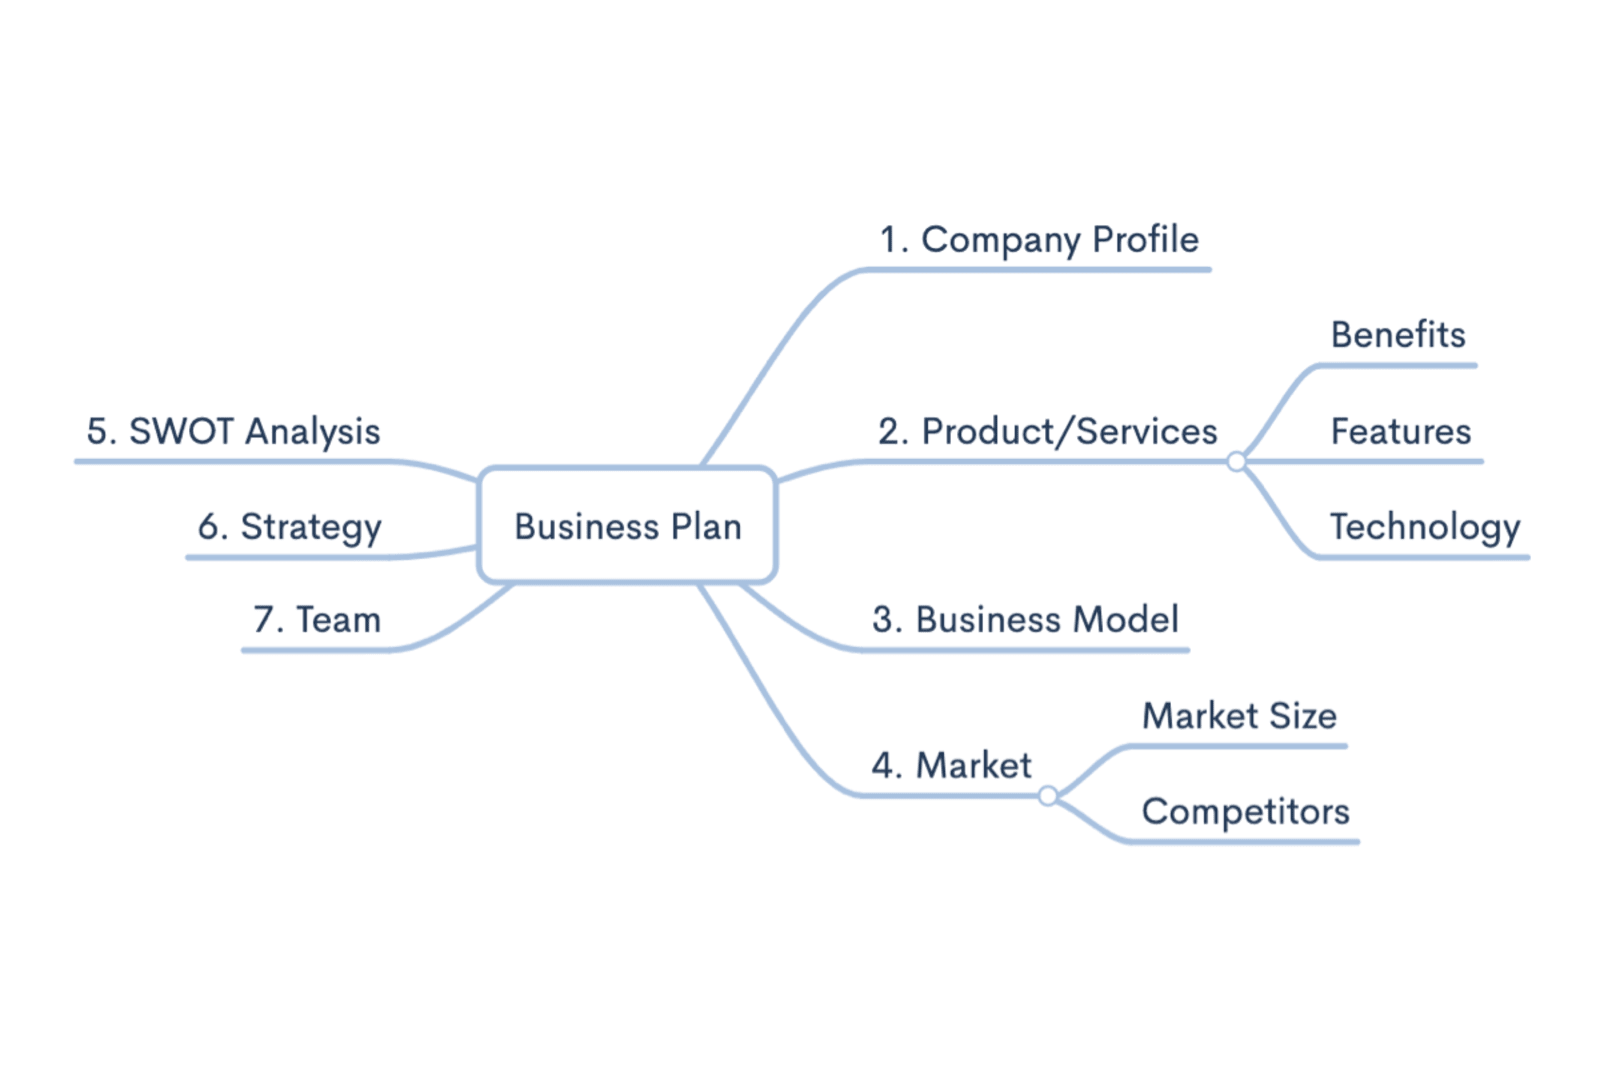
Mindmapping
Your ideas require an outlet for the right representation of the concepts. More visual mind mapping will ensure better execution. Moreover, you will be able to analyze and comprehend in a better way to work around idea generation and iteration cycle after cycle. You may use tools such as Mindmeister to explore an idea, add branches, and visual signifiers for representation.
This will assist you in brainstorming your app’s process and design features. You may also choose from some of the best mind mapping tools to organize all the vital information and create the best app design.
Step 2. Prototyping
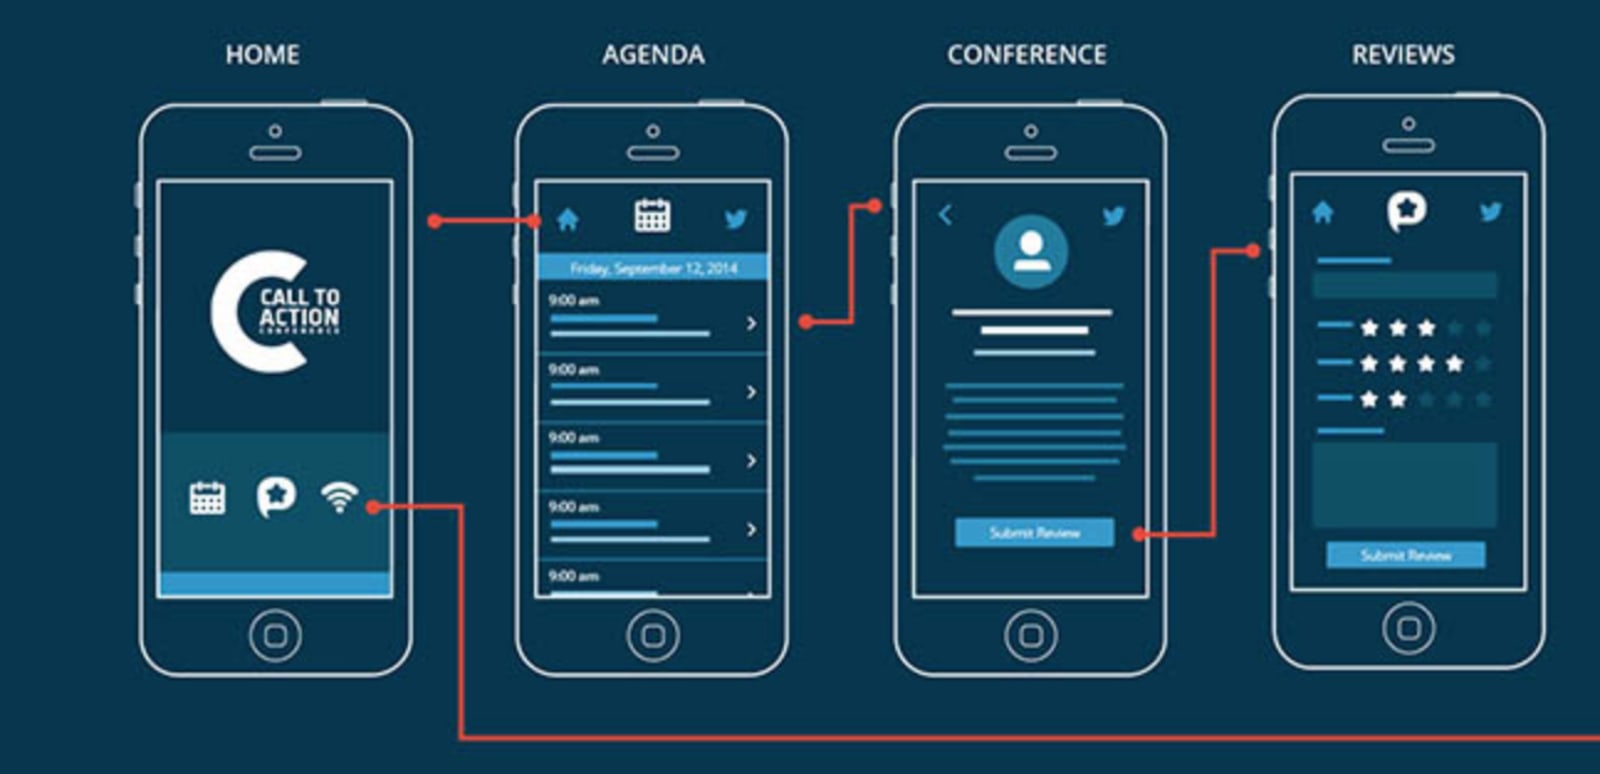
Paper-Made Prototypes
You can only succeed in app design if you follow all the steps and incorporate the basics of drawn prototypes and a handful of users to test them. You may start by creating your essential tasks and run them with a very small group of users. Also, focus on new trends and add them to the next iterative cycles for improvement. Moreover, learn how to create a design that has visuals to enhance customer service and experience.
Low-Fidelity
These types of prototypes are great for the initial stage of your app design. As they are just mock-ups, they don’t require any user interaction and are quick to create. You may use wireframing to create design blueprints. It has a sketch of the placement of elements in your app. This may include content, images, illustrations, creation of videos, icons, logos, symbols, and components.
Keep in mind that these elements do not contain any colors, graphics, or media. So, focus on the right placement and the flow of use. You may use tools such as Balsamiq and paper for wireframes with easy perspectives.
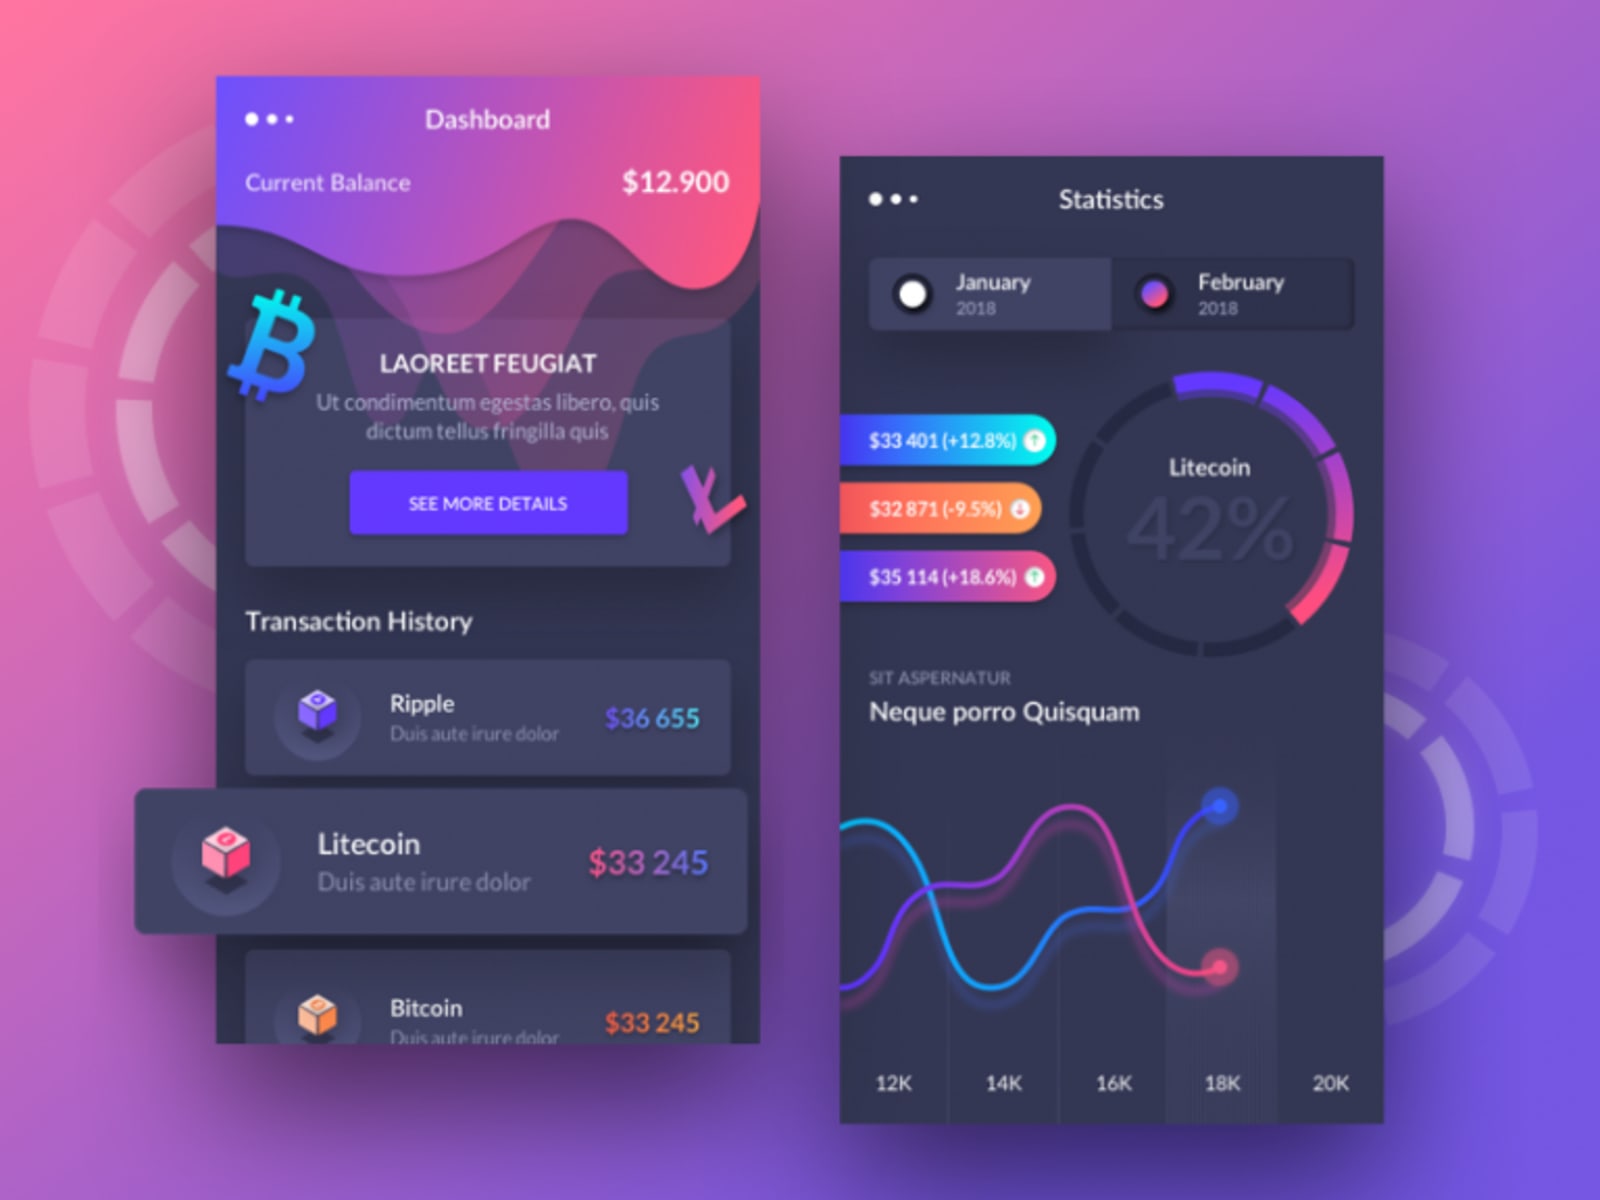
High-Fidelity
These are more advanced and realistic computer-based prototypes that allow user interactions. They assist in understanding how the app will work and may give an accurate representation of the end product. You may add colors, typography, white space, contrasting visuals, designed icons, and media content in this prototype.
These features allow the users to provide constructive feedback and use the real type of application as a prototype. Use the tools Figma to create a high-fidelity model.
Step 3. UI design
Color Scheme
Each application design has a unique color scheme and contrasts. You may choose from various schemes such as monochromatic, analogous, triadic, complementary, tetradic, and split-complementary. However, ensure you use colors in contrast as per the WCAG guidelines so that it is equally accessible to all users. Note that color scheme is vital as a bad design can harm your website in ways such as a high bounce rate and missing out on essential features.
UI Kit
The most vital thing to understand the graphics and resources is to study the UI Kit. It contains the library for the streamlined design process with the right features and icons. Moreover, it helps the designer to save time while creating new components and graphics. It also adds functionality and boosts the performance of the developer.
Besides, the end product is free of foggy icons, smudgy buttons, or small clips. It assists in creating better visuals for the users without neomorphism as the developer has access to all the necessary design components.
UI design
UX and UI of the app go hand in hand. After the design, the advanced elements of UI and UX come into the picture. The design to prototype stage should also focus on building your personal brand as it may help you directly communicate with the users to get the most out of your new app. You should follow web design principles of building your brand and identity at this stage of app development.
You may add clickable layouts with Figma to mimic the resulting app for the test cycles. Also, this makes it easier to find errors and implement changes. With the non-coded app design process, you will have a better understanding of reaching the final product.

Maksym Babych, CEO at SpdLoad, a product development company for early-stage startups.